SKIE Features Demo
· 17 min read

Modern mobile apps generally have several layers of architecture, and there has always been considerable difference of opinion on how to best configure architecture. In recent times, Compose UI and Swift UI have presented new possibilities, but also new architectural challenges that the community is still thinking through.
Attempting to explain SKIE within the context of a more complete app would be potentially confusing, as the architectural and “real world” problems that need to be addressed in a “real” sample app will add complexity. We built our SKIE sample app as an artificially simple example to demonstrate exactly what SKIE does.
Getting Started
Clone the demo repo code.

Open that project in either Intellij or Android Studio.
Because this is a demo of SKIE, there’s no Android app included. We’re just going to talk about how SKIE helps with the Swift-facing portion of the project. One of the major reasons for building SKIE was to be able to write Kotlin APIs for both Kotlin and Swift callers that don’t need much in the way of special compromise or wrappers. The Android side should just call the shared Kotlin as if it was any other Kotlin. It is the Swift side that gets the improvement with SKIE.
Once you have the Kotlin project open, you’ll need to open the iOS project in Xcode.
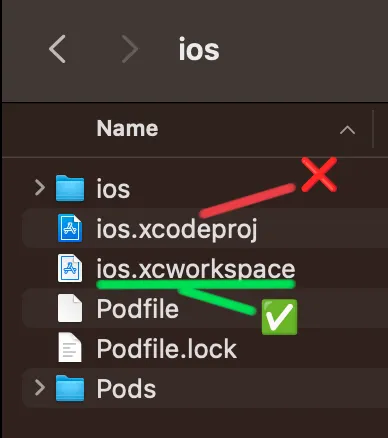
First, open a terminal to the ios directory and run:
pod install
pod install, you may need to fix your local dev setup. See the Kotlin docs on setting up your dev environment. Now open the ios module with Xcode. Be sure to open ios.xcworkspace rather than ios.xcodeproj. Also make sure you are on a compatible Xcode version. 14.3.1 is recommended as of this writing.
You can open the folder in mac’s Finder app and double-click on the ios.xcworkspace file.
When the iOS project is open in Xcode, select an iOS simulator and run the project. It should successfully compile and start the demo application. If not, please reach out for support.
Demo Sections
SKIE supports two main types of features: type augmentation and Coroutines interop. The demo is roughly split across these.
Part 1 - Type Augmentation
The first screen in the app is a simple calculator. The user can enter values and run calculator operations. The calculator section will demonstrate the basics of SKIE’s type augmentation.
Calculator Screenshot
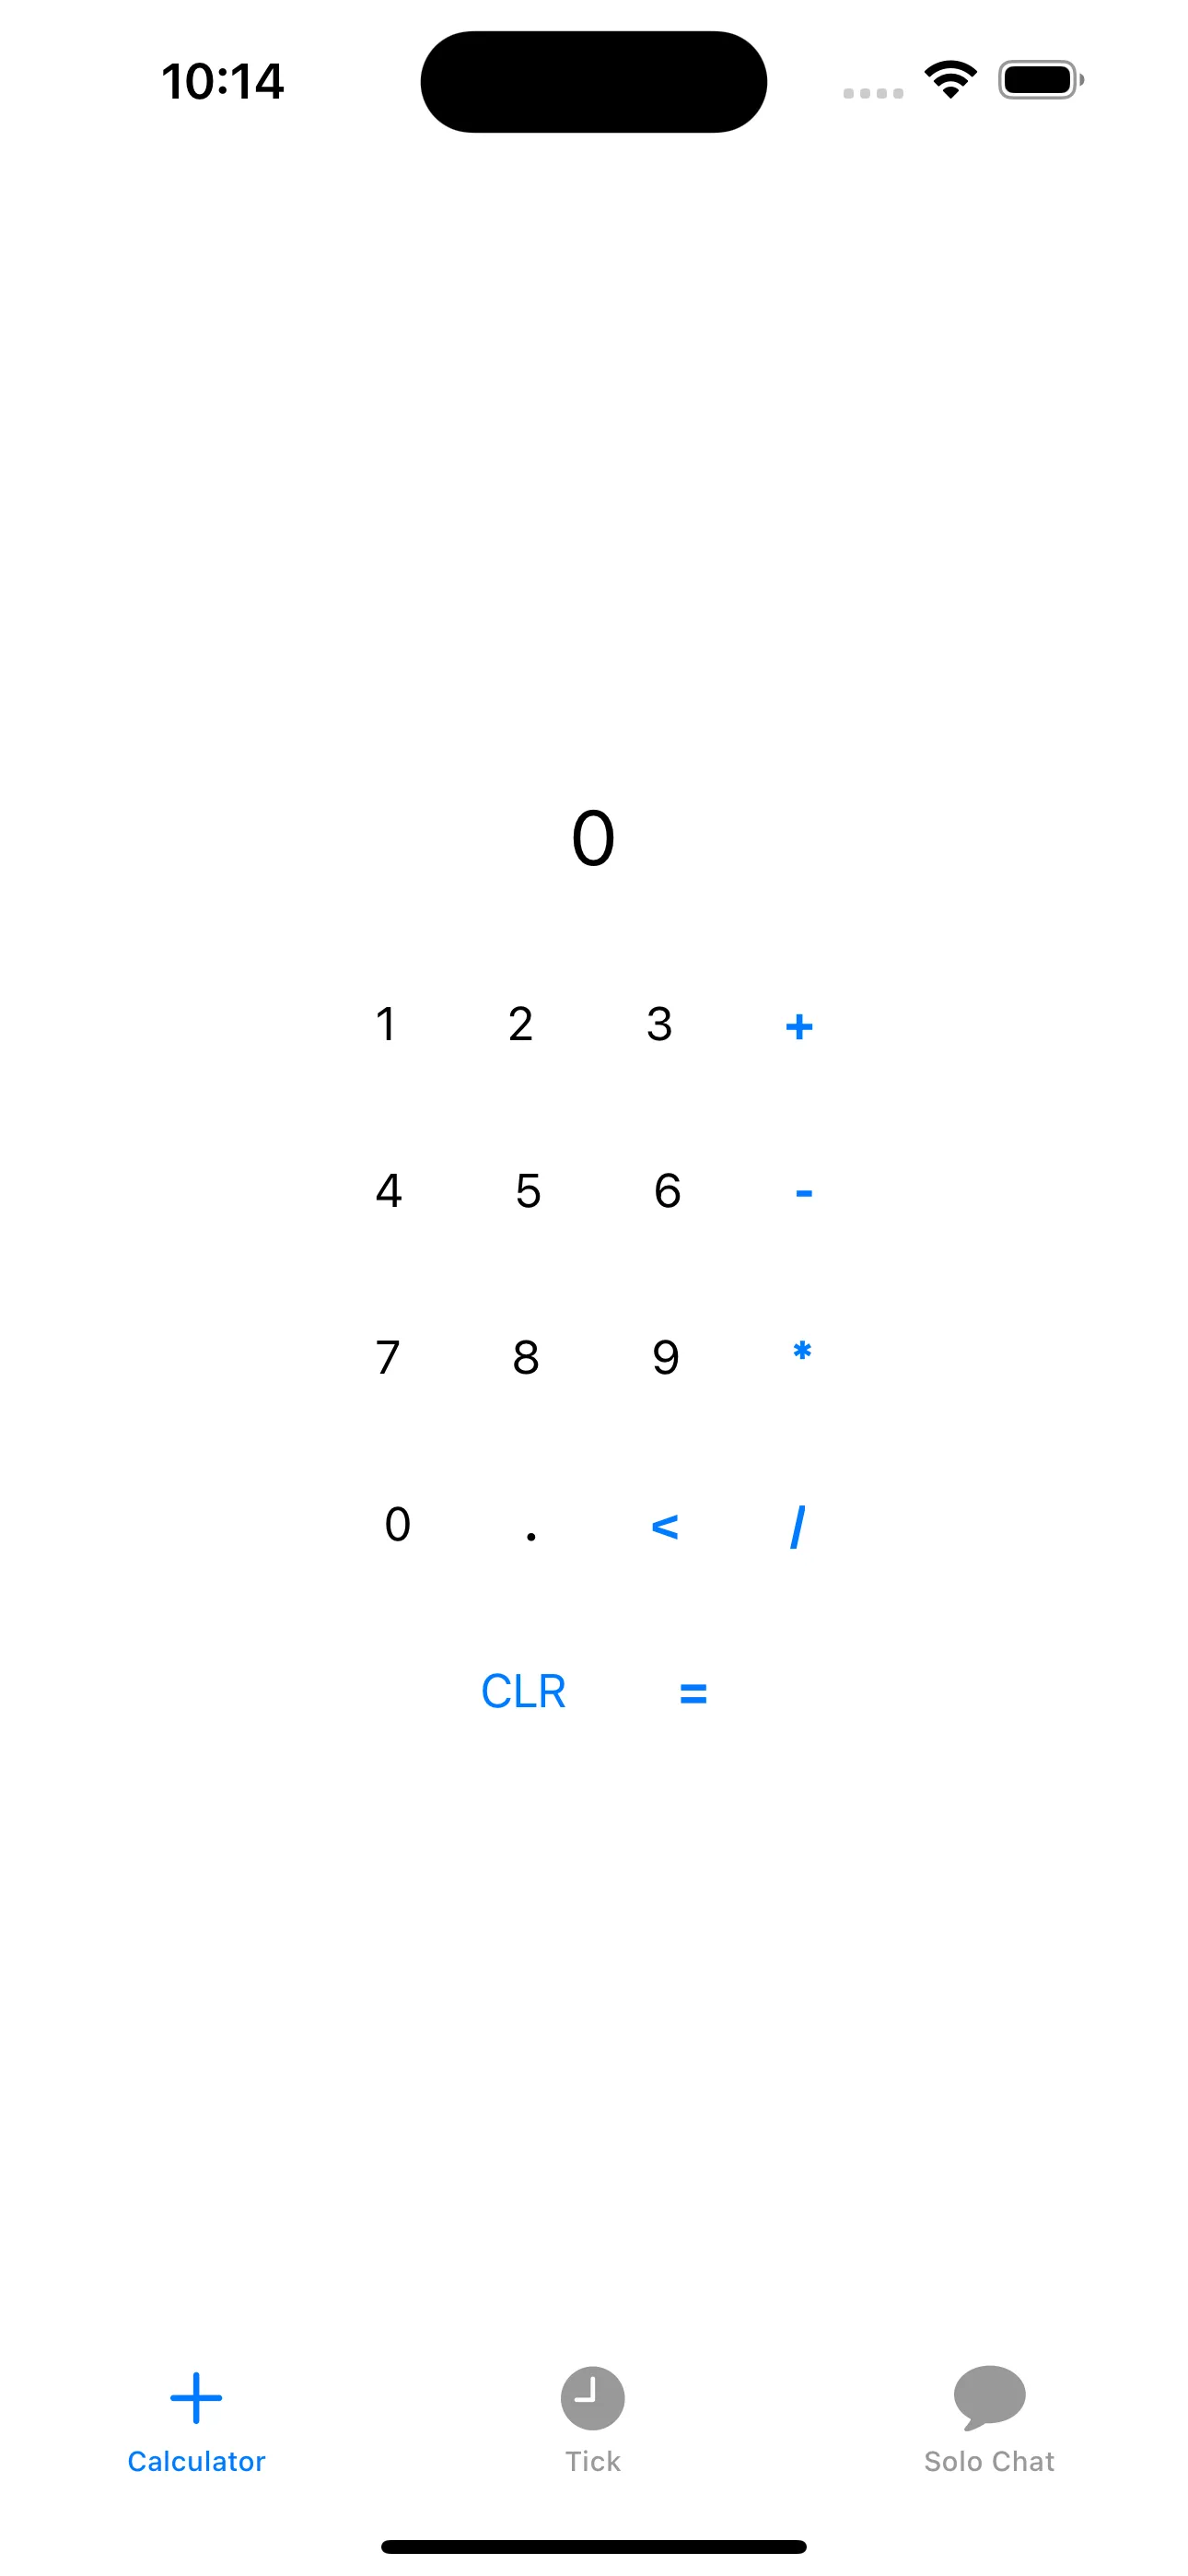
User input is in the form of strings. Behind the scenes, the Swift UI code calls into shared Kotlin code, to parse the inputs and return structured values.
In the Kotlin code, find the folder commonMain/kotlin/co/touchlab/skie/types. In the Swift code, open Computation.swift.
Enums
First we have a basic enum class that represents the type of entry from the user:
enum class EntryType {
    NUMERIC, OPERATION
}

fun lookupEntryType(value: String) = when (value) {
    in "0".."9" -> EntryType.NUMERIC
    "." -> EntryType.NUMERIC
    else -> EntryType.OPERATION
}
The Swift code will pass in a string and get an enum value in return. In the Swift code, we examine that value and make decisions. See handleNumericTyping for an example of how we use the enum.
func handleNumericTyping(entryType : EntryType, inputValue: String) {
    switch (entryType) {
    case .numeric:
        // Do numeric stuff
    case .operation:
        // Do operation stuff
    default:
        print("Do nothing")
    }
}
Kotlin enums in Swift are not exhaustive. That’s why we need the default case in the switch statement. While seemingly minor, this is a problem. If more enum values are added, your Swift code won’t be aware of them, which is a type safety issue. Some teams write Swift enum wrappers around the Kotlin enums, but that doesn’t solve the issues. If you forget to update the wrapper, you have the same problem. We’ll show how SKIE addresses this in a bit.
Sealed Classes
There is a sealed class OperationType to represent various calculator operations, and a function that parses strings to return the appropriate sealed class.
sealed class OperationType {
    data class Unknown(val message: String) : OperationType()
    object Plus : OperationType()
    object Minus : OperationType()
    object Divide : OperationType()
    object Multiply : OperationType()
    object Clear : OperationType()
    object Delete : OperationType()
    object Equals : OperationType()
}

@DefaultArgumentInterop.Enabled
fun lookupOperationType(
    value: String,
    defaultValue: OperationType = OperationType.Unknown("Oops")
) = when (value) {
    "+" -> OperationType.Plus
    "-" -> OperationType.Minus
    "/" -> OperationType.Divide
    "*" -> OperationType.Multiply
    "C" -> OperationType.Clear
    "<" -> OperationType.Delete
    "=" -> OperationType.Equals
    else -> defaultValue
}
Of note here, data class UNKNOWN represents an error state, and the function lookupOperationType includes a default argument for the error state.
Back in Swift, we switch over the OperationType value to determine what to do. Because sealed classes have no special meaning in Swift, they are just “classes”, they are also not exhaustive. This presents the same basic problem that we have with Kotlin enums.
To switch over the operation type, we simply check class types.
func handleMathOperation(operationType: OperationType) {
    switch operationType {
    case is OperationType.Clear:
        doClear()
    case is OperationType.Delete:
        doDelete()
    case is OperationType.Equals:
        doEquals()
    case is OperationType.Plus,
        is OperationType.Minus,
        is OperationType.Multiply,
        is OperationType.Divide:
        doMathOperation(operationType: operationType)
    default:
        failApp() // This should never happen :)
    }
}
That is not ideal, of course. Again, we need a default case, and we’re so certain that we’ve coded everything correctly that we call failApp(), as an unknown case is simply not possible to imagine :)
Of course, this is an extremely simple example. If you’re paying attention, you’ll see a problem immediately. In a real code base, sealed classes may change, and again, the Swift side won’t know. That is potentially dangerous.
Default Arguments
Please notice that in the Swift code, we need to explicitly pass in a value for default arguments because they aren’t available on the Swift side:
let operationType = OperationTypeKt.lookupOperationType(
    value: inputValue, defaultValue: OperationType.Unknown(message: "unknown")
)
While this is arguably not as much of a type safety feature, it is certainly a quality of life improvement if we can get them back, and in some cases where a default changes, this could actually be a real problem.
Run it!
It is important to point out here that although we’re highlighting some specific issues, this code does work fine. KMP for sharing code to Swift is amazing tech. It is not perfect, but when well applied, it is a great thing to have.
It works. Now lets make it better.
Adding SKIE
We don’t really need to “add” SKIE to the demo. It already exists in the project. However, for the purposes of the demo, the type augmentation features have been disabled.
Open shared/build.gradle.kts and find the skie config block.
skie {
    features {
        group("co.touchlab.skie.types") {
            SealedInterop.Enabled(false)
            EnumInterop.Enabled(false)
        }
    }
}
Remove it entirely. We’ll run SKIE with defaults on everything.
id("co.touchlab.skie"). This was already done for the demo. Now, run the project again. Kotlin will recompile the Xcode Framework, and the app should run the same as before.
Swift Enums
In Xcode, open Computation.swift. The first thing to notice is you have a new warning. Scroll down to it.
Inside handleNumericTyping, the default case now has a Default will never be executed warning. It still compiles, but Xcode is telling you that you don’t need a default. That is because EntryType is now exhaustive.
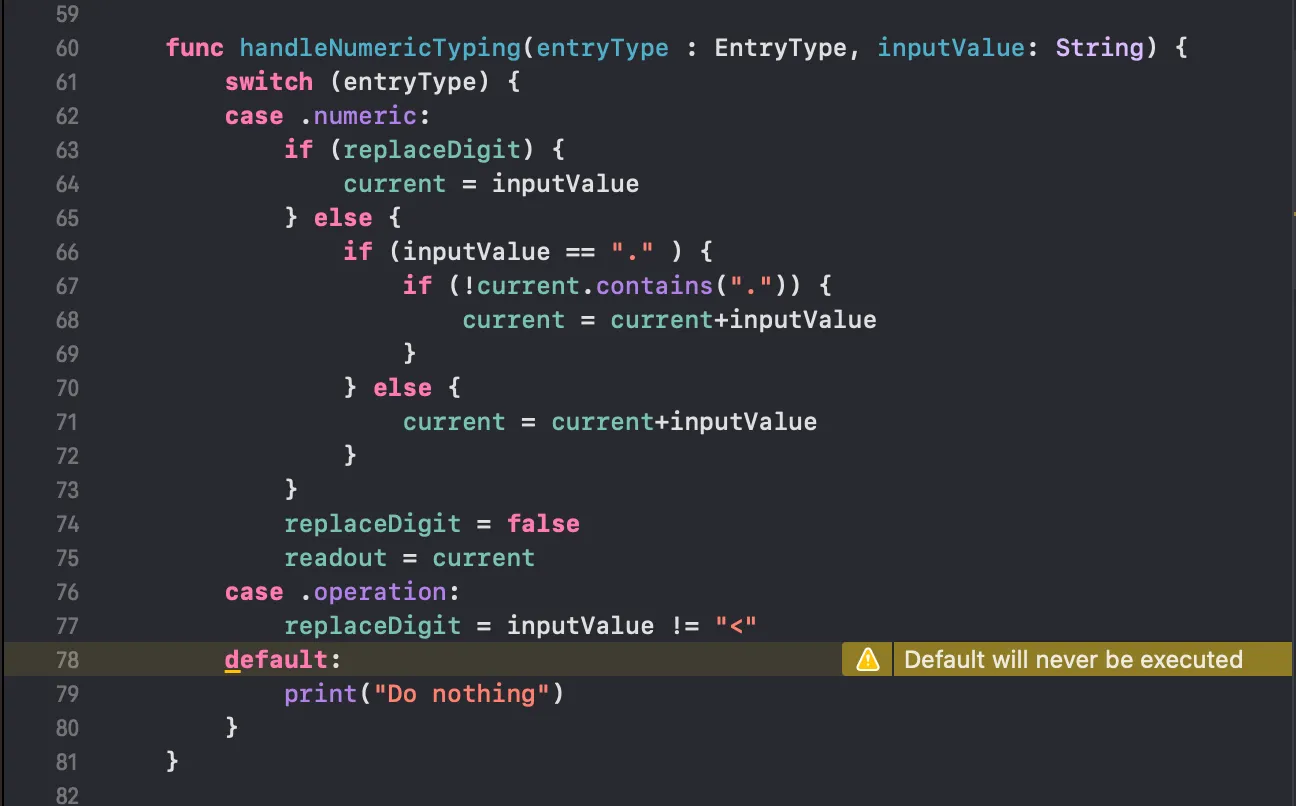
How? It is no longer a Kotlin enum! It is a real Swift enum with the same name and values. SKIE generates Swift enums for you, and automatically translates Kotlin enums to Swift enums when calling back and forth between Swift and Kotlin. No source changes necessary. For most standard situations, this is a drop-in replacement. The underlying Kotlin enum is still available, but has been renamed with two underscores to hide it from Xcode autocomplete. To access it, you could do the following:
let kotlinEntryType:__EntryType = entryType.toKotlinEnum()
This is not a perfect solution. There are edge cases. See the SKIE Docs for more info.
Remove the default case. You no longer need it.
Default Arguments
Going back up in the code, we mentioned that lookupOperationType needed an explicit defaultValue because default arguments are not available to Swift. SKIE can add these, but we do not globally enable this feature by default. It can have negative impacts on compile time and possibly binary size as it generates extra functions. By default, we recommend adding the @DefaultArgumentInterop.Enabled annotation to functions you would like to have with default arguments.
Back in Kotlin, add @DefaultArgumentInterop.Enabled to lookupOperationType. Rebuild the project in Xcode. Now you can simply remove the defaultValue parameter.
Sealed Classes
Sealed classes in Kotlin solve a conceptually similar problem that enums with associated values do in Swift. They are similar structures, but once you get beyond basic cases, they are sufficiently different. Simply porting sealed classes to enums is problematic. However, SKIE introduces a mechanism to access sealed classes exhaustively.
For each sealed hierarchy, SKIE generates a Swift enum. To access that enum, SKIE also generates a global function onEnum for each sealed type.
It sounds complicated, but once you see it, it’s simple.
In the Swift code, in handleMathOperation, change the switch statement:
func handleMathOperation(operationType: OperationType) {
    switch onEnum(of: operationType) {                   // 1
    case .clear:
        doClear()
    case .delete:
        doDelete()
    case .equals:
        doEquals()
    case .plus,                                          // 2
        .minus,
        .multiply,
        .divide:
        doMathOperation(operationType: operationType)
    default:
        failApp() // This should never happen :)
    }
}
See 1. Call onEnum with the sealed class as the argument. That will return the corresponding Swift enum.
Note 2: the cases are no longer checking by class type. These are actual, exhaustive Swift enums.
Sealed classes can now be checked exhaustively. Remove the default case. Give Xcode a little time to think. It’ll point out a problem. You’ll see “Switch must be exhaustive”.
Let Xcode add the final case. We “forgot” Unknown.
case .unknown:
    print("Unknown")
The unknown type is a data class with a value. We want to access that, and fortunately that is simple.
The underlying sealed class instance is available as a parameter, cast to the correct type.
case .unknown(let result):
    print("Unknown \(result.message)")
That is a simple example of how sealed classes can be used from Swift. Keep an eye on Touchlab content in the future as we’ll add more examples showing how to use more complex sealed class hierarchies.
Review
Our calculator sample now has some type augmentation added. To see the sample with our changes applied, checkout the part1 branch.
Many teams building KMP for Swift learn to avoid features that don’t work well from the Swift side. Adding SKIE to a new project from the start, and understanding what it does, will help make creating these APIs simpler and make calling them from Swift safer, and honestly, more enjoyable.
If you have existing code, try introducing sealed classes in places where they would be useful but they’ve been avoided!
Part 2 - Coroutines Interop
Coroutines are a critical feature for most Kotlin projects. More generally, modern languages need support for asynchronous and reactive communications. When the Kotlin compiler builds the Objective-C interface that is called from Swift, it is very limited in what it can do to present Coroutines features to Swift.
The result is one of the major pain points of KMP and Swift: the effective loss of Coroutines in the API.
The Kotlin compiler does export these structures, although in problematic ways. Many teams write callback wrappers manually. There are also some other open source options. Notably KMP-NativeCoroutines. This is an excellent library and has become something of a standard for calling Coroutines from Swift.
SKIE’s design takes Coroutines and implements direct, idiomatic interop. We wanted to remove the need for lifecycle ceremony, and participate directly with Swift’s asynchronous support. In summary, we wanted Swift code calling into SKIE-enhanced Kotlin code to act as if it was simply calling other Swift code.
Flow & Friends
Flow-based structures present to Swift as instances of AsyncSequence, and carry over the subject type as proper generics. From the Swift side, they participate directly and bi-directionally in the async lifecycle. That means they support cancellation automatically.
Back in our Kotlin code, open TickProvider.kt. This is a simple object that provides functions to create Flow<Unit> instance. They loop and emit Unit values, telling the front end to increment a counter.
@DefaultArgumentInterop.Enabled
fun ticks(period: Duration = 1.seconds): Flow<Unit> = flow {
    while (true) {
        emit(Unit)
        delay(period)
    }
}
    .onStart { println("onStart") }
    .onCompletion { println("onCompletion $it") }
The main function also adds some Flow lifecycle log statements that you’ll be able to watch from Xcode.
In Xcode, open TickDemo. In the view, notice starting on line 11:
.task {
    await viewModel.activate()
}
That is a “task modifier”. That block is run when the view is created, and provides an asynchronous context for Swift to run async code. In that block, we call viewModel.activate(), which is where our interesting stuff happens.
func activate() async {
    let secondCounter = TickProvider.shared.ticks()
        .scan(0) { acc, _ in
            acc + 1
        }

    for await tick in secondCounter {
        message = "Tick: \(tick)"
    }
}
The only Kotlin code called here is TickProvider.shared.ticks(). That returns an instace of AsyncSequence. The function scan here is interesting. We could avoid it and loop over the ticks stream directly, but we added scan to demonstrate that these are actual Swift structures. scan is from a 3rd party Swift library, and it all works as expected.
When you run the sample, click on the “Tick” tab in the menu. It’ll open a screen that counts up, and in the Xcode log, you’ll see our Flow lifecycle event onStart.
Now click on the “Calculator” tab. You’ll see our other Flow lifecycle event.
onCompletion kotlinx.coroutines.JobCancellationException: ProducerCoroutine was cancelled; job=ProducerCoroutine{Cancelling}@[some id]
As mentioned, using SKIE augmented Flow instances from Swift automatically participates in Swift’s async lifecycle.
TickProvider.shared.ticks vs TickProvider.shared.ticksWithoutSKIE For another example of Flow, open ChatRoom.kt. This is a repository class for something we call “Solo Chat”. It’s a basic chat app window, but no server. We’re simulating a chat.
The data is kept in a StateFlow:
private val _messages = MutableStateFlow(emptyList<String>())
val messages: StateFlow<List<String>> = _messages
Note the type: List<String>.
Messages are sent by a suspend function, we simulate a server with a delay, then just add the string to the data.
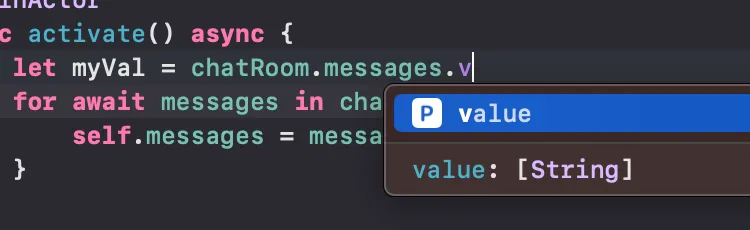
Back in Xcode, open ChatRoomDemo. This use of AsyncSequence is very simple. We have ChatRoomViewModel, with some Swift state, and just a loop over the data from Kotlin.
class ChatRoomViewModel: ObservableObject {
    let chatRoom = ChatRoom()                     // 1

    @Published
    private(set) var messages: [String] = []      // 2

    // Etc

    @MainActor
    func activate() async {
        for await messages in chatRoom.messages { // 3
            self.messages = messages              // 4
        }
    }

    func sendDraft() {
        // Etc
    }
}
- We create an instance of our Kotlin class.
- Our local state is an array of
String. chatRoom.messagesis anAsyncSequencewith a subject type of[String]. Proper types are retained between Kotlin and Swift.- Since we have correct types, we don’t need to do any casting or type checking.
The correct type handling between the platforms makes publishing an API with Flow types much cleaner to work with.
StateFlow
SKIE has special support for some of the common Flow implementations. We’ll have a deeper dive soon, but in this example, you can see the type is SkieSwiftStateFlow<[String]>.

It is an AsyncSequence to Swift, but it also publishes some special properties of StateFlow. In this case, you can access .value like can with StateFlow. If this was a MutableStateFlow, you’d be able to set .value as well.
Suspend Functions
Suspend functions produced by the Kotlin compiler can be called with Swift’s async syntax, but they have some critical issues:
- Cancellation is not supported
- They can only be called from the main thread (currently)
The latter can be particularly problematic, as Swift may make threading decisions at runtime that you don’t see at development time.
SKIE makes your suspend functions available to Swift and you can call them with the async syntax. They can be called from any thread and support cancellation. The details of how the threading works is interesting, and we’ll have some deep dive content about that soon. In summary, SKIE acts and presents to Swift as if it was just another Swift library.
We’re going to demonstrate the features mentioned above with ChatRoomDemo.
In the Kotlin code, open ChatRoom.kt. We have two suspend functions:
suspend fun send(message: String) {
    delay(1.seconds)

    _messages.value += message
}

@SuspendInterop.Disabled
suspend fun sendWithoutSKIE(message: String) {
    send(message)
}
The main one, the first, is enhanced by SKIE. The second is not (note @SuspendInterop.Disabled). We’re going to compare these two from Swift.
When the user sends a message, we call delay(1.seconds) to simulate a server call. Then the data is appended to our StateFlow.
Back in Xcode, open ChatRoomDemo.swift and scroll to line 64 func sendDraft(). If you run the code now and open the “Solo Chat” tab, you can enter a message and click the button. We’ll get the artificial server delay, then the message will show up.
To show cancellation, uncomment lines 73-81.
Now, this is obviously not something you’d do in a real app, but we’re going to try to simulate cancellations. Here is the code:
func sendDraft() {
    guard !messageDraft.isEmpty else { return }
    Task { @MainActor in
        defer {
            messageDraft = ""
            isSending = false
        }
        isSending = true

        let task = Task {                               // 1
            try? await chatRoom.sendWithoutSKIE(        // 2
                message: messageDraft
            )
        }

        task.cancel()                                   // 3

        await task.value

        try? await chatRoom.send(message: messageDraft) // 4
    }
}
At 1 we’re kicking off a new task, then at 2 we’re sending a message, but with the non-SKIE suspend function sendWithoutSKIE. As 3, we’re immediately cancelling that task, then at 4 we’re calling the original method to send the message.
If cancellation works, we’ll see one copy of the message show up in the UI. Of course, we see two, because the suspend functions that are produced by the Kotlin compiler do not support cancellation.
Change the sendWithoutSKIE to send, and run it again.
let task = Task {
    try? await chatRoom.send(
        message: messageDraft
    )
}

task.cancel()
This time we get one message, because the call was cancelled properly.
To demonstrate that SKIE suspend functions work on any thread, we’ll first show you that the default suspend functions do not.
We’re going to make the Task block Task.detached, which will run on a different thread, and call sendWithoutSKIE:
let task = Task.detached {
    try? await self.chatRoom.sendWithoutSKIE(
        message: self.messageDraft
    )
}

task.cancel()
If you then send a message, the app will actually crash. Swap sendWithoutSKIE with send and everything works as expected.
Error Handling
Suspend functions with SKIE are throwing functions to Swift. That means you need to call them with some form of try. In the ChatRoomDemo.swift file, we send a message with:
try? await chatRoom.send(message: messageDraft)
The method throws to support cancellation, essentially. If that method has an exception that isn’t CancellationException, by default, it will crash on the Kotlin side. If you annotate that method with @Throws, it will bubble up to Swift in the same way a non-suspending function would.
For Flow, throwing CancellationException will cancel the Flow, and in turn, the AsyncSequence. Throwing anything else will crash on the Kotlin side. The current design of SKIE is that you should catch and handle other exceptions before getting to Swift. We are evaluating designs to let Flow throw other exceptions, but there are no concrete plans right now. Feedback welcome.
Next Steps
That is the SKIE feature overview. If you are starting a new project, we would recommend simply adding SKIE and using it from the start. Head right over to the SKIE Installation Docs to get started.
If you have existing code, it is highle recommened that your next step is the SKIE Migration Guide . If you understand how SKIE works and what it does, introducing SIKE to existing code is straightforward. If you simply apply the plugin without a plan, you’ll likely break some things on the Swift side.
Touchlab is primarily a services business, focused exclusively on Kotlin and KMP technology. If you are looking to make an investment in your KMP success, we offer both direct help and our premium content and support service Touchlab Pro.
We will have much more SKIE content coming soon. Be sure to subscribe to one of our channels, and find us on the Kotlin slack.