· 15 min read Posted by Kevin Galligan, Russell Wolf
KMMBridge Quick Start
Getting Started With KMMBridge
Old KMMBridge Version
KMMBridge is at v1
This post was written for an earlier version of KMMBridge. Please see the new Quick Start and use that instead.
Quick Start
~/.netrc auth. Orientation
In summary, you need to be using GitHub and have the rights to create and administer repos for your org. For more detail, open “GitHub Prerequisites”
GitHub Prerequisites
GitHub Required
This template is configured as a standalone Kotlin repo, hosted on GitHub, relying on GitHub Actions and GitHub Packages. It can be a public or private repo.
If your team is using GitHub, unless you have a strange config or regularly run out of CI or hosting resources, you should be able to use this project immediately.
However, if:
- You don’t use GitHub, or need a different CI
- You’d rather publish an iOS Kotlin module from an existing Android repo
you will need to do some more work to integrate KMMBridge.
In any case, we still strongly suggest you finish this Quick Start. You will learn how publishing works, and make sure your configuration is functional before attempting other custom integrations.
Prep Work
- Make sure you have admin access to your Github org.
- At a minimum, you’ll need to be able to create another repo, or have somebody else create one from our template. If you want to publish to CocoaPods (details in the next post), you’ll need to create a publishing repo and have rights to grant access to it, so there will be a few admin-level steps.
- Make sure you’re able to use GitHub Actions for builds and Github Packages for artifact hosting.
- Generally speaking, all account types, free or not, should be able to use these features. Worst case, you can test out the Quick Start in a personal account before moving it to your “work” account.
- Once you get this up and running, you can move builds to other CI and hosting platforms. However, as mentioned, we suggest you finish this Quick Start.
Required Setup
You will need to be able to build Android and iOS apps, with KMP code, on your local machine. Technically you could run the Quick Start template on CI without that, but you’ll have no way of testing anything.
If you don’t regularly code KMP, we would highly suggest getting a sample project running first. That should help isolate any potential trouble you run into.
Swift Package Manager vs CocoaPods
The KMMBridge Quick Start will be in two parts: basic setup with SPM (this post), and additional CocoaPods setup (the next post). You can publish to either or both with the same project, and the initial setup for both is very similar, but CocoaPods has several extra steps. If you want to publish to CocoaPods, make sure to do both.
Project Structure
KMMBridge will work in any repo configuration, but there are some common patterns.
- Android project links directly to shared Kotlin, but publishes an external iOS binary.
- A separate repo from which both Android and iOS artifacts are versioned and published.
The Quick Start is configured as a separate KMP code repo. #2 in the list above. You publish versioned binaries for both Android and iOS consumers.
There are 2 local test projects that allow you to build and test your Kotlin code directly, both Android and iOS. You can then “publish” both builds, with automatic “patch” versioning (ex. “1.3.534”), to the GitHub Packages repo attached to the Quick Start project. Assuming the rest of your team has access to your repo, you can immediately include those builds in any app (although you’ll probably want to write some code specific to your app. The Quick Start code is unlikely to be useful 🐶).
KMMBridge also supports publishing an iOS Framework from a module in your Android codebase. #1 in the list above.
Go!
1) Use Our Template Repo to Create Your Kotlin Repo
Open the starter template project:

Click “Use Template”, give your repo a name, and create it. It can be public or private.
2) Edit GROUP
Very Important! You’ll need to edit the group string for your repo before you publish. Open gradle.properties and edit GROUP. The value for GROUP needs to be a valid maven coordinate string. Generally speaking, it should be reverse domain (“com.whatever”) and a name for the project, all lower case.
GROUP
value before publishing You can make this edit directly in the GitHub web interface and commit it immediately. If you clone your repo and edit locally, obviously you’ll need to commit and push before the next step…
3) Publish A Build
After the repo has been created and GROUP has been specified:
- Open the repo page on GitHub.
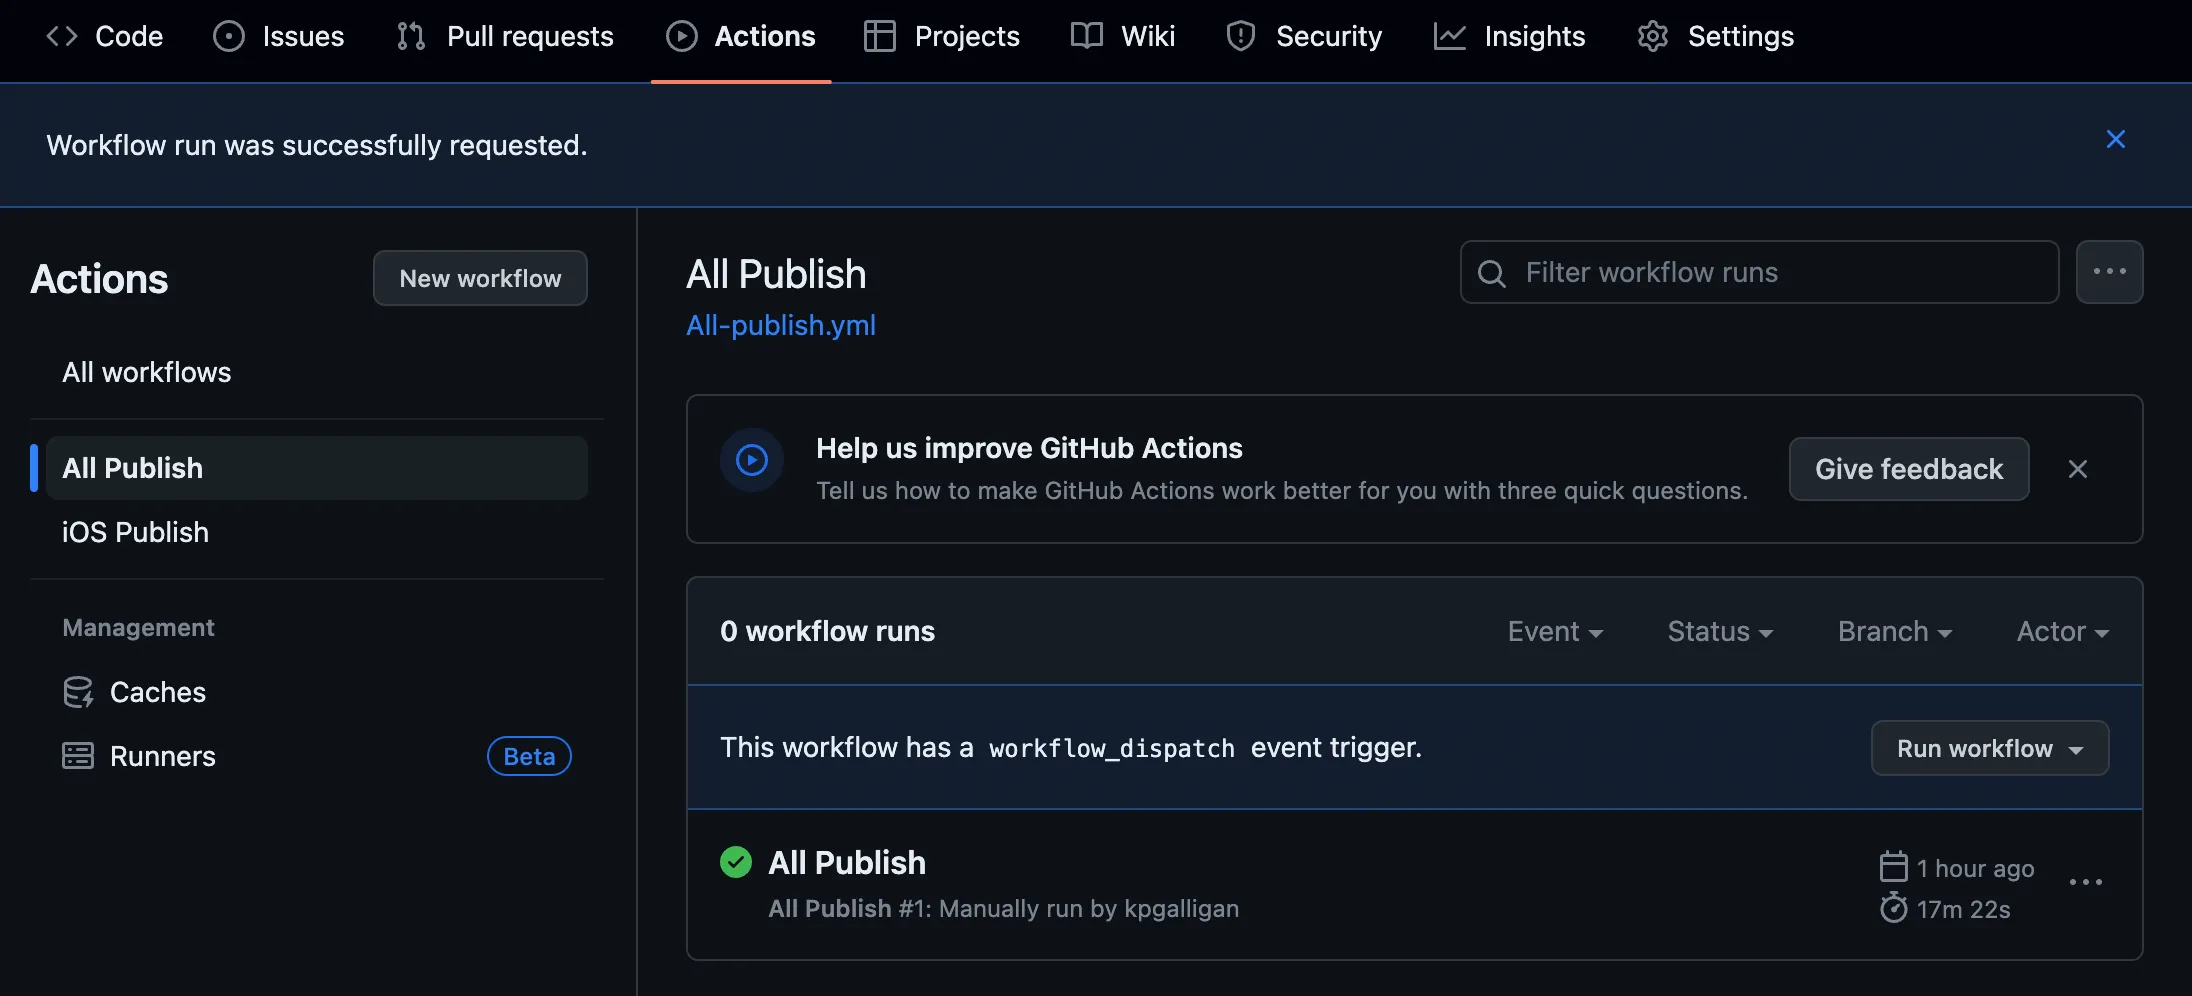
- Go to “Actions” and run one of the available CI workflows.
Both actions are similar, but publish different artifacts.
All PublishWill publish iOS and Android binaries.iOS Publishwill build and publish just the iOS SDK. No Android binaries.
Select All Publish and run the workflow.
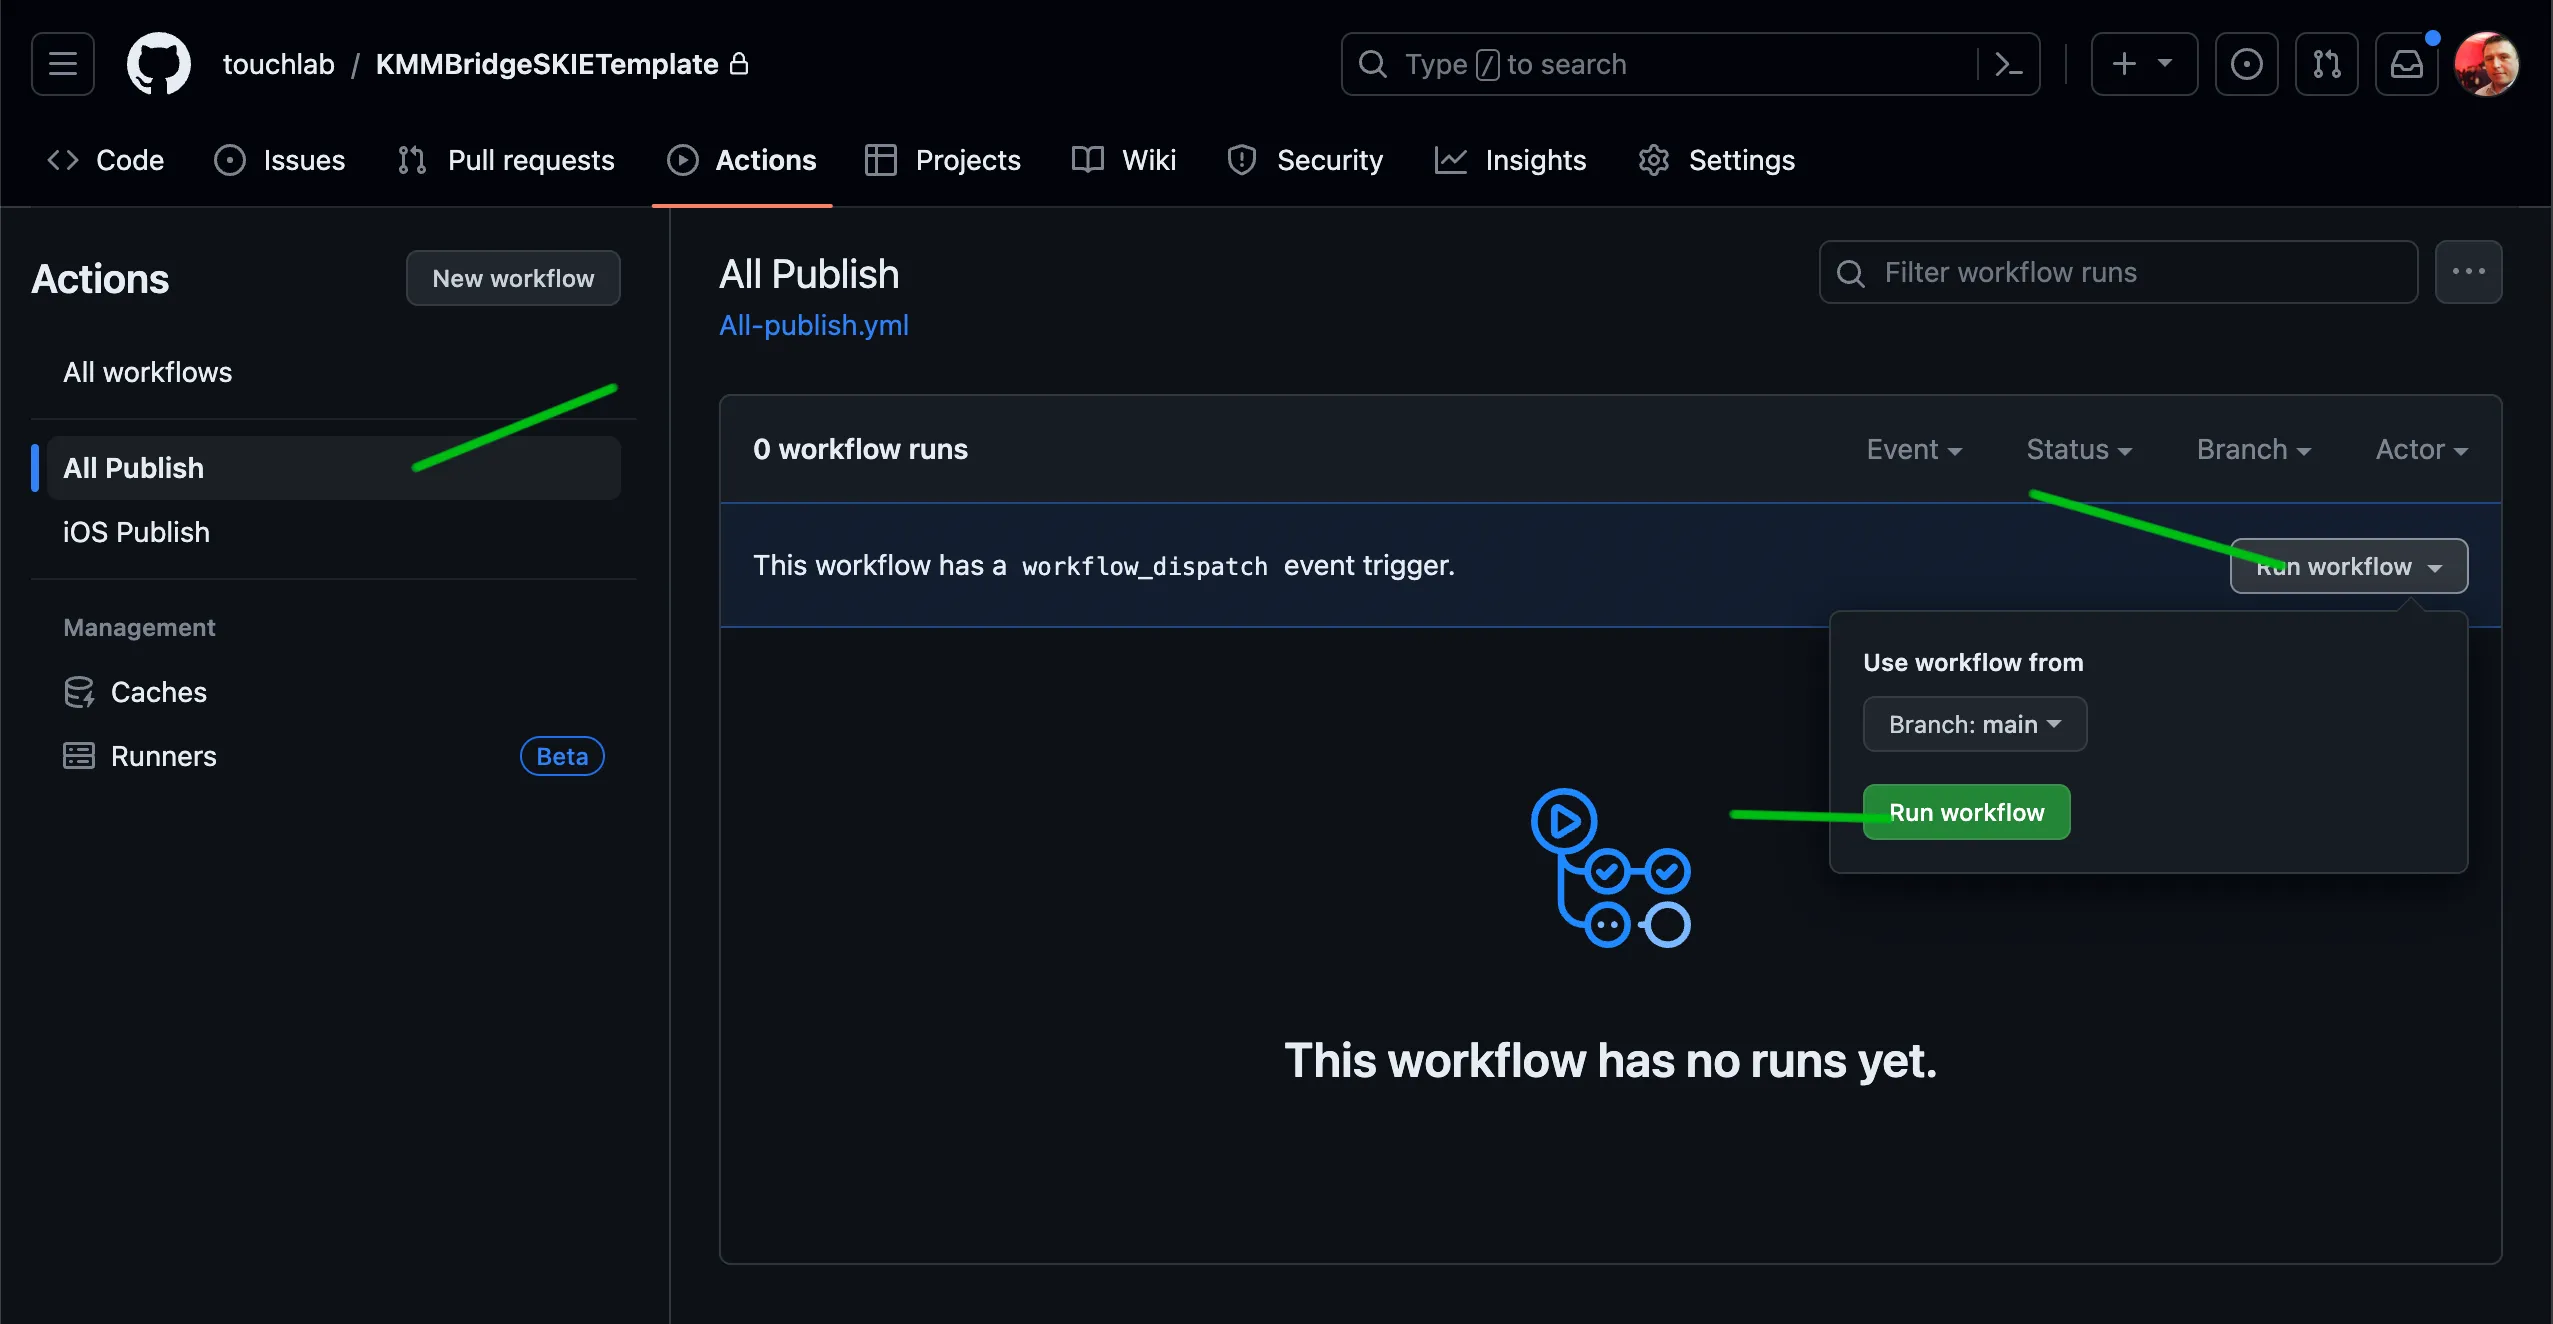
iOS Publish. If you have a separate repo for your Kotlin code and want to publish Android and iOS packages, use All Publish. For the rest of this post, we’ll assume you ran All Publish. Check In #1 (~15 minutes)
Assuming no major surprises, you should have your first build processing. The build will take a fair bit of time. 10-15 minutes.
Running Test Apps
While your CI is running, let’s discuss the test applications in the template repo. When you publish binaries, other projects will get them from GitHub Packages. However, the test apps build and run the Kotlin code locally. The concept is that you can build and test locally, then commit and publish binary versions.
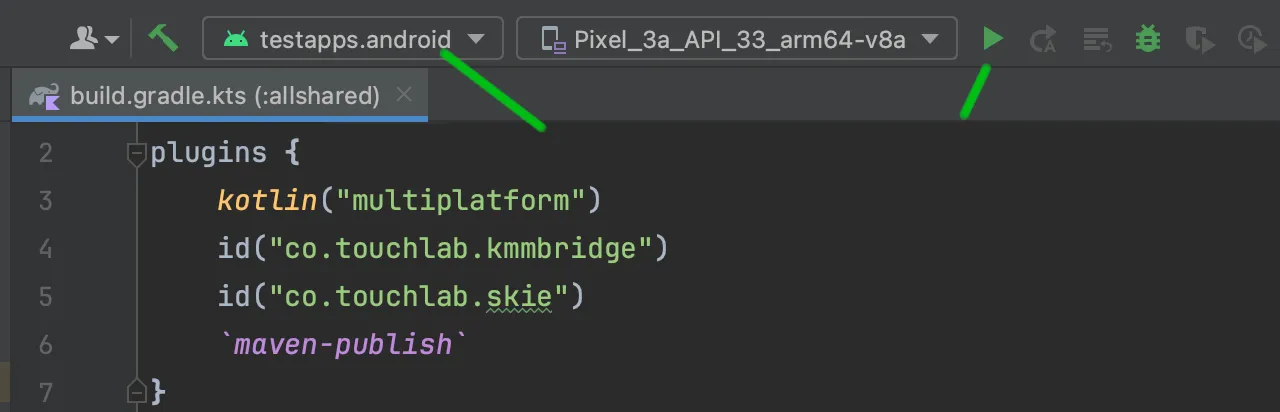
Android
The Android app is already set up to run. If you are in Android Studio or Intellij, the configuration should have been detected, and you can probably just run it from the actions bar without any other configuration.
iOS
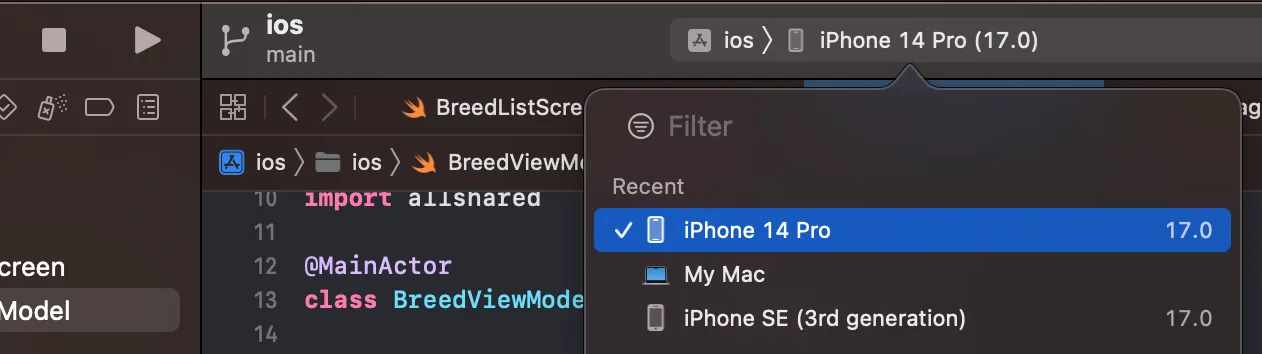
Open testapps/ios/ios.xcodeproj with Xcode. The test project uses Direct Integration to build the Kotlin Framework. You should be able to pick a simulator (iPhone only!) and run the project. Kotlin builds for iOS can take some time, but just let it run.
What are the local development options for iOS with KMP?
For most app projects, you are using Xcode tools to compile and assemble an app binary and run it in an iOS simulator. The Kotlin project will produce an Xcode Framework that the iOS/Xcode project and include and call from Swift or Objective-C.
By “local development”, we the process by which Kotlin code gets built, locally on your dev machine, and then included in the iOS app project.
There are 2 main ways provided by JetBrains: CocoaPods local dev and Direct Integration.
CocoaPods local dev mode essentially uses CocoaPods to configure Xcode to build the Kotlin code and add it to the app. While many team use CocoaPods, many avoid CocoaPods entirely, and the idea of using CocoaPods to build Kotlin is not well received. To some degree, this is a non-issue, because using local CocoaPods for building Kotlin doesn’t require you to do anything with CocoaPods for the rest of the app. However, CocoaPods does require installed tooling, and the config can get broken if different devs have different versions. There are also some interesting quirks with the Kotlin CocoaPods support.
Direct Integration is fairly simple. You add a build phase to Xcode that runs the Gradle task embedAndSignAppleFrameworkForXcode. Xcode provides various environment variables about what target you are trying to build, and embedAndSignAppleFrameworkForXcode can interpret them to build the correct output. You also need to set up some search paths and linker flags.
CocoaPods was our generally preferred method until recently. We still use it, but for simple, direct setups, Direct Integration can be a better approach.
What we have not worked on yet with Direct Integration is a way to “toggle” local development on and off, to test a larger app against the shared Kotlin code directly. We do have docs explaining that for CocoaPods and SPM.
Besides the “official” local dev options, KMMBridge implements a very simple local dev flow using SPM. We currently do not hook into Xcode automatically for the build. You need to run it on the command line. However, time permitting, we will attempt to improve that integration in the future.
Success! (?)
If the build ran successfully, here is what you should expect to see.
The GitHub Actions Panel
The name of the workflow you ran should be in the list, with a green checkmark next to it. The full build is usually 15-20 minutes.
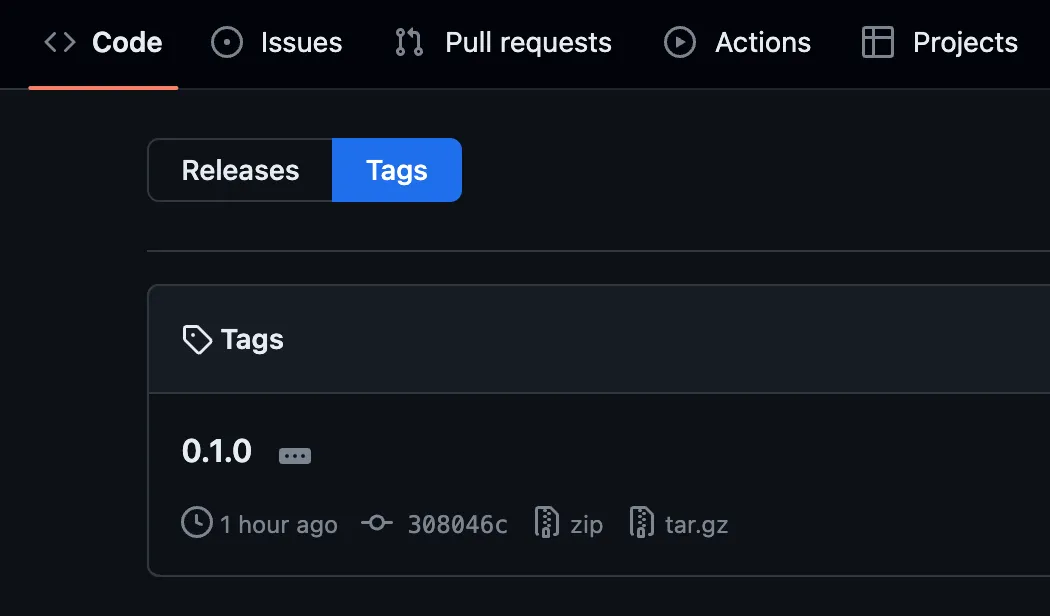
Git Tags
Versions for SPM are marked by tags in the repo. Our build adds a tag for each build, based on the LIBRARY_VERSION property in gradle.properties. In the template, the value is set to 0.1. Our automatic versioning starts at 0 and counts up. the first version should be 0.1.0.
GitHub Packages
Our template is configured to store published builds in GitHub Packages. We built All Publish, which builds Android and iOS. The iOS artifact is just a zip file with a special Maven artifact name (kmmbridge).
The Android publication adds several other artifacts.
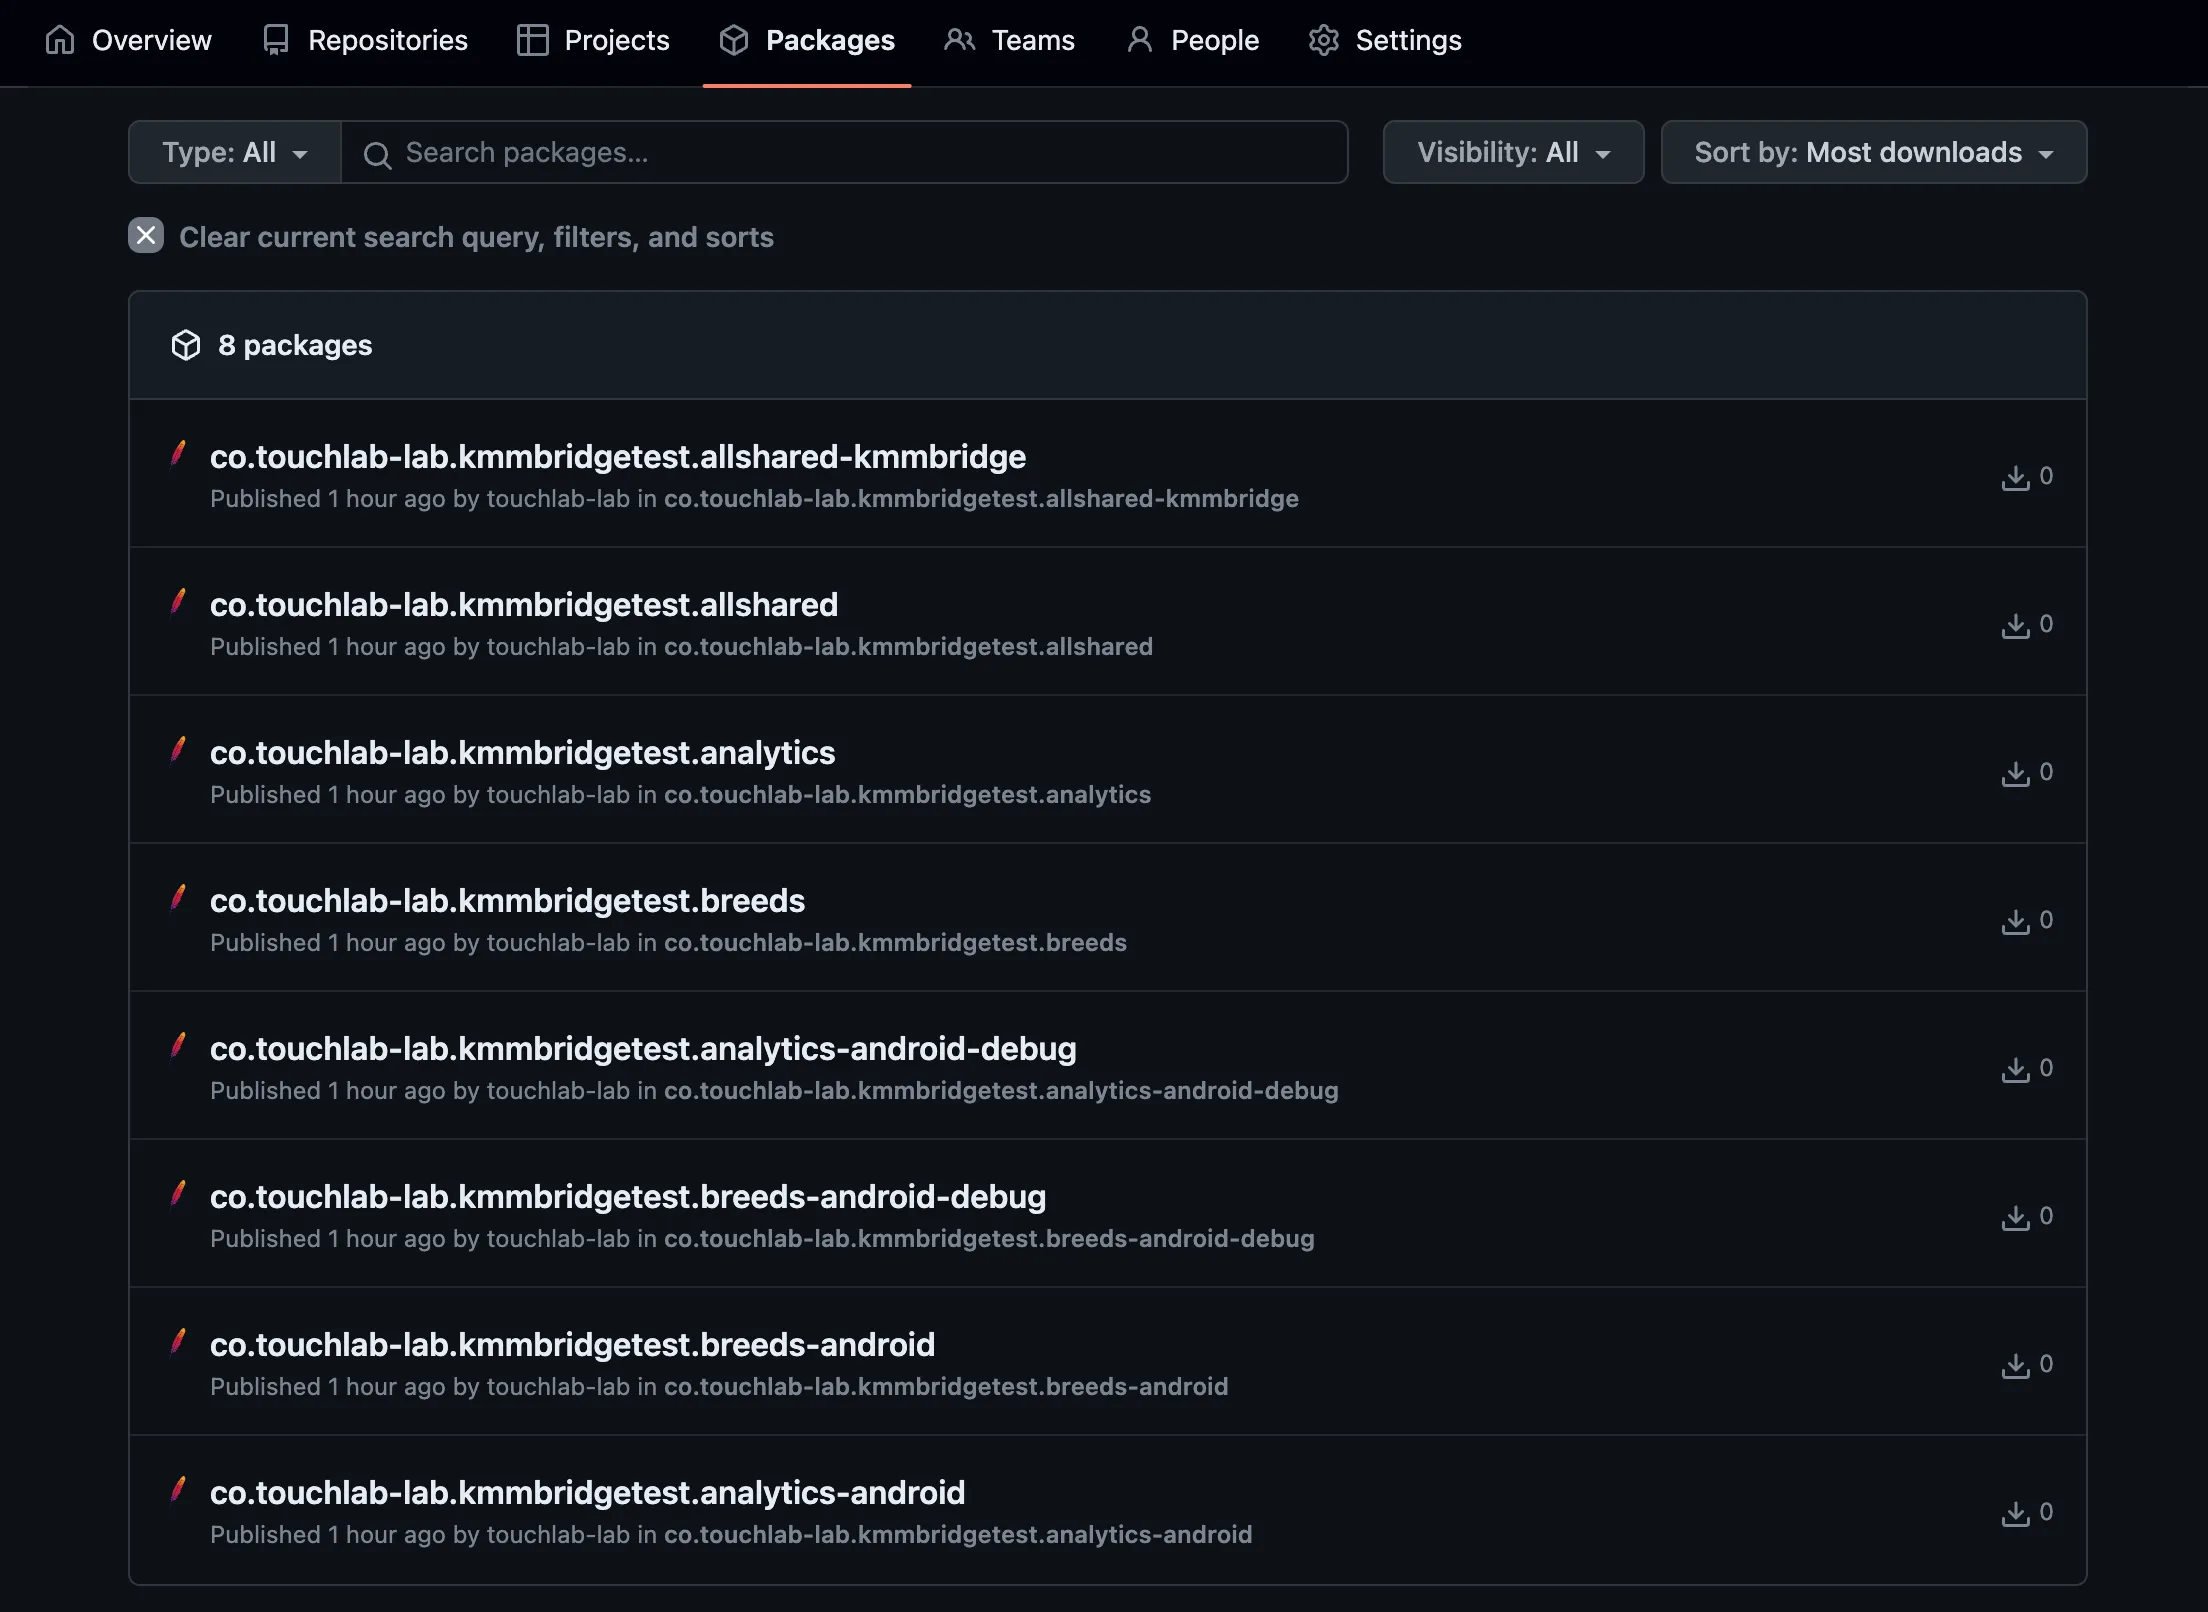
Public Example
For this post, I created a repo from the template. You can see the build output there: touchlab-lab/KMMBridgeTest
What if it fails?
Typically, a deployment would only fail during the build phase, before publishing, or if publishing access is not configured correctly. Publishing to CocoaPods is much more likely to fail, at least early on while sorting out configuration (we’ll walk through publishing with CocoaPods in the next post).
Our publishing interface actually pushes artifacts before everything is finalized. If the build fails after that push, you will have artifacts in the published repo, but no version recorded. If that happened, and you attempted to publish again with the same version, the publish would fail (with file hosts that don’t let you overwrite, such as GitHub Packages).
To avoid this, we apply marker tags with our GitHub Actions Workflow. These are cleaned up on a successful publication. The summary is, if you have a failed build, you may see a marker tag in your GitHub tags, and after a successful build, the release tags will have a gap.
0.1.00.1.10.1.40.1.5- Etc
That would mean that something went wrong when publishing 0.1.2, and again for 0.1.3, but was resolved for 0.1.4. The build would need to succeed before publishing, so any error like this was a publication-related error. Once correctly configured, this should rarely, if ever, happen, but it is possible.
Read more about the publishing workflow and versioning mechanism here.
Configure IDE Clients
In this Quick Start we are using GitHub Packages. To access your binaries, both Android and iOS clients will need to point to your repos to access them. Also, while your repo can be public or private, GitHub Packages requires a user to authenticate to access the packages.
ArtifactManager. For either client, Gradle or Xcode, you need to set up GitHub authentication to access the GitHub Packages binary. Xcode has an additional step for SPM, but only when using private repos. That is confusing. It would be great if GitHub Packages just didn’t do that (hint: write to GitHub Support).
For Every User
You need a GitHub username, and a Personal Access Token with at least repo and read:packages permissions.
Creating a Personal Access Token
To create a GitHub PAT, open GitHub, then find your user settings. Open “Developer Settings” at the bottom of the left menu.
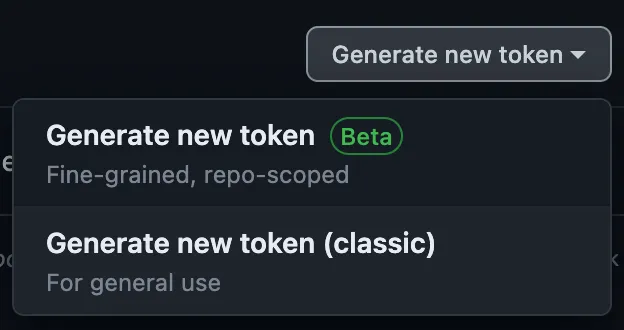
Select Personal Access Tokens and select “classic”.
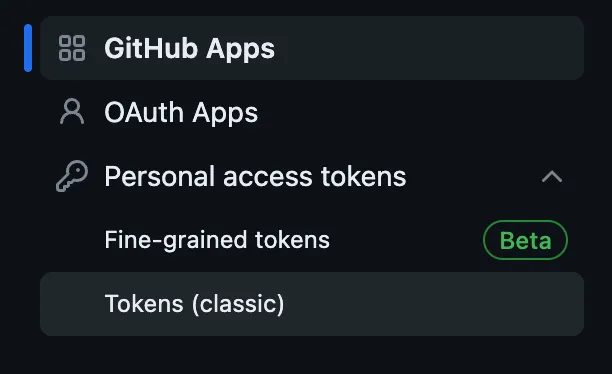
Create a new token, again “classic”.
Give it a name, select expiration, then make sure to select repo and read:packages permissions.
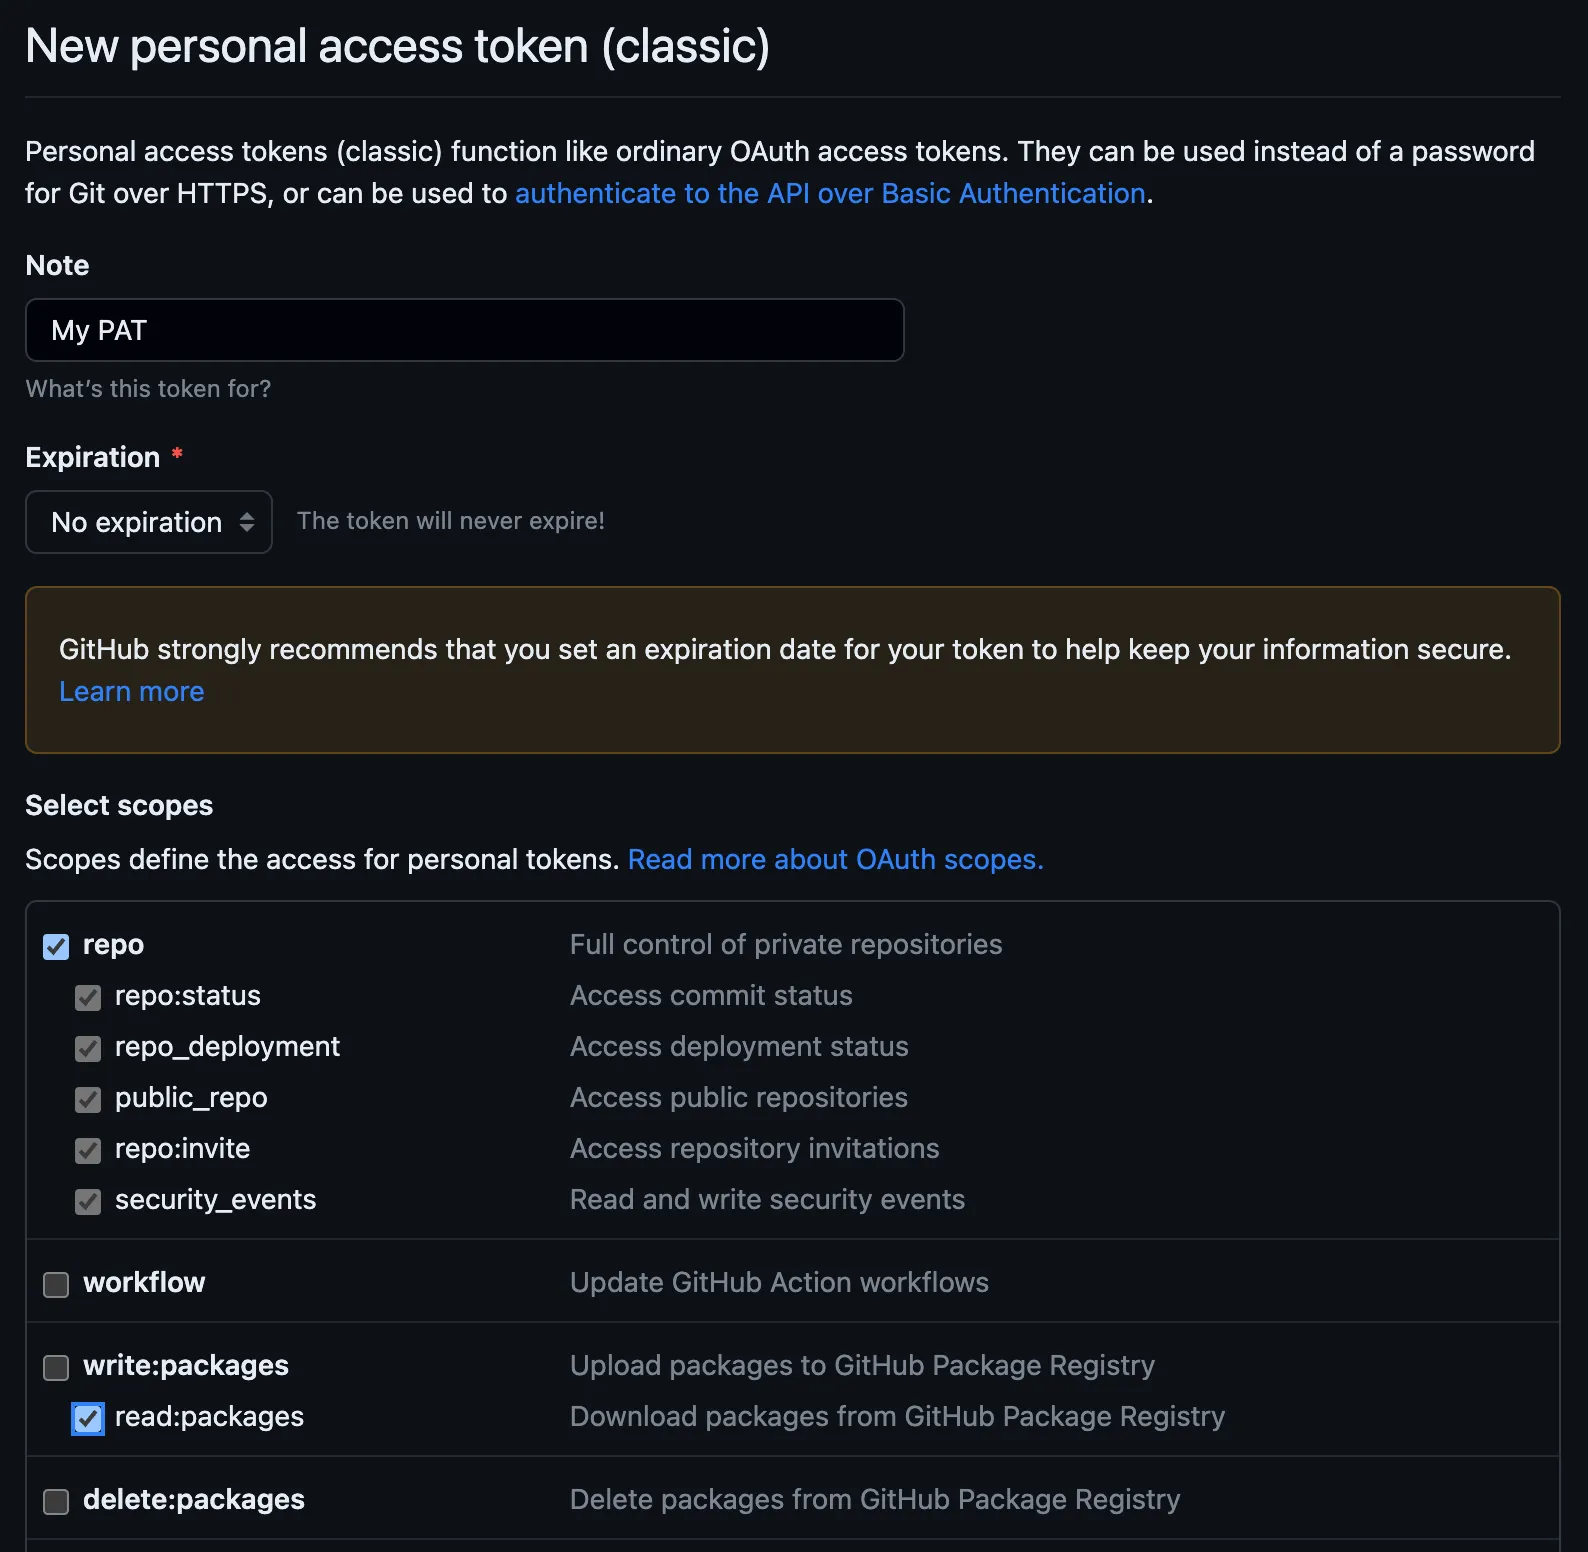
Make sure to copy that PAT string. It should look something like ghp_A_WHOLE_BUNCH_OF_CHARS_AND_NUMBERS
Gradle (Android Studio/Intellij)
For Gradle, you need to add the maven repository where your package is stored, along with the authentication information.
In one of your Gradle build files you’ll need to add the repo.
repositories {
    maven {
        name = "MyRepoName"
        url = uri("https://maven.pkg.github.com/[your org]/[your repo]")
        credentials {
            username = "[username]"
            password = "[PAT string]"
        }
    }
}
Generally speaking, you don’t want to put you username, and certainly not your PAT, directly in the Gradle code. Our recommended setup is to use a Gradle property.
credentials {
    username = project.property("GITHUB_PACKAGES_USERNAME") as String
    password = project.property("GITHUB_PACKAGES_PASSWORD") as String
}
On your local machine, you can add these values to your global Gradle properties ~/.gradle/gradle.properties. For CI, you can add them as secrets and pass them into Gradle.
With that configured, assuming your build published successfully, you should be able to use your library from an Android/Gradle project.
Xcode
When using GitHub Packages, or any repo that requires user authentication, you will need to add auth to your system config. This is true whether you are using SPM or CocoaPods to configure your dependencies.
You will use the same username and PAT that you used for Gradle. On your local machine, create or open the file ~/.netrc. This will be in your home directory. It may already exist, but if not, create it.
Add the following:
machine maven.pkg.github.com
  login [your username]
  password [your PAT]
Put your username in the login field, and the PAT in the password field.
Check In #2 (~30 minutes-ish)
Check the GitHub Actions panel to see if your build is done. If it is still processing, please wait till it is complete before moving on to the next steps.
Add the Framework to Xcode
Assuming you’ve configured your ./netrc file above, you can now access your build from Xcode.
./netrc file for this. It is a strange quirk, but yes, you need to configure GitHub auth twice. Swift Package Manager (SPM)
To add your Framework to Xcode with SPM, do the following:
- Get the GitHub URL from your new repo (I generally copy the clone https URL)
- In Xcode, go to
File > Add Packagesto open the SPM tool - Paste your GitHub URL in the “Search or Enter Package URL”
- Select your repo and for “Dependency Rule”, select “Up to Next Major Version” (or next minor version, either will pick up patch releases). Xcode should auto-detect the version.
Important!!! The sample Kotlin code needs to link to Sqlite on iOS, and the SPM support doesn’t have a way to specify those dependencies yet. You’ll need to open “Build Settings”, find “other linker flags”, and add -lsqlite3.
That’s it! You should be able to import your Kotlin code now. Watch the video to see how to use the SPM library:
Build and Run
In your iOS project, you should be able to call a test Kotlin function we’ve added to the iOS code. For example, in the default Xcode SwiftUI project template, try the following. Add import allshared, then call StartSDKKt.sayHello().
import SwiftUI
import allshared // <- import your new module

struct ContentView: View {
    var body: some View {
        Text(StartSDKKt.sayHello()) // <- Say Hello!
            .padding()
    }
}
import allshared before you build. Xcode indexing is not always in sync. Final Check In (less than an hour, hopefully 😎)
Congratulations, you’ve now built, published, and consumed Kotlin Multiplatform dependencies. That pretty much covers what KMMBridge does.
If your team uses GitHub, you can go right ahead and hack away at the code in the template repo. If you are using something other than GitHub, you’ll likely need to do more configuration. Please see the KMMBridge docs. You can also reach out if you have specific questions.
CocoaPods
If you want to publish to CocoaPods, contine to the CocoaPods setup in part 2.
Next Steps
Here are a few things to check on now that you’re done.
- Check out the KMMBridge Doc on GitHub for some more info.
- Join #touchlab-tools on the KotlinLang slack to discuss with other developers
- Sign up for our newsletter to keep up with our other projects for multiplatform teams